Showing posts with label Linux Tips. Show all posts

How to install Ubuntu Linux on Mac OS X

Ubuntu is a computer operating system based on the Debian Linux distribution and distributed as free and open source software, using its own desktop environment. It is named after the Southern African philosophy of ubuntu ("humanity towards others"). Ubuntu is designed primarily for use on personal computers, although a server edition also exists. There are other distribution of Linux like Fedora, Mandriva, Open SUSE, Cent OS, etc. but Ubuntu stands out among them because of its graphical user interface and its free to use.


The following article explains how to dual-boot Ubuntu and Mac OS X on an Intel Mac.


Dual-Boot: Mac OSX and Ubuntu


OSX.png Linux.png

Quick steps


  1. Install rEFIt and make sure it is working (you should get a boot chooser on startup)
  2. Use Bootcamp or Disk Utility to create a partition at the end of the disc. Don’t worry about what format, just make it the size you want for Ubuntu and your swap partition. If you you are using OS X Lion which comes with Bootcamp 4.0 you will need to use the Disk Utility. Boot Camp 4.0 will only allow you to resize to install Windows 7.
  3. Boot the Ubuntu desktop CD, and select "Try Ubuntu. Start the partition editor (gparted) under System > Adminstration. Use gparted to delete the partition you just made in OS X. It should be the last partition on the disc and follows after the HFS+ partition (OS X). Deleting it will leave an area called unallocated. This is free space, and exactly what you want. Use gparted to manually partition the space on your drive for Ubuntu. First create a SWAP area of about 1GB. Then the rest of the unallocated area format as EXT4. Apply changes and take note the label of the EXT4 partition such as /dev/sda3.
  4. Start the Ubuntu Installer from the desktop icon. When prompted, choose to manually partition. Select the EXT4 partition and click change. Select to use the space as EXT4 and root (/) as the mount point. You will also want to check the box to format the partition.
  5. Reboot when done with the install, and in the rEFIt menu, choose the partition tool. It will attempt to sync the partition tables on your disk. Then SHUTDOWN the computer (not reboot), and start it again. You should be able to boot to Ubuntu now. If it seems to freeze on the tux logo, completely shutdown again and try one more time.

Detailed How-To


Installing rEFIt


INSTALL rEFIt! You don’t HAVE to use it once you get Ubuntu up and running, but until then, you will need to install it because You will need it after installing to sync partitions, once you have done that and Ubuntu works, then you can uninstall it. You can even burn a rEFIt CD if you prefer. If you do not see the rEFIt boot menu when starting your Mac on the second reboot (It takes two reboots to apear after using the package installer), it is not installed properly!

Partitioning


The first thing we need to do is repartition your Mac’s hard drive. Of course, we would like to do this non-destructively (without wiping out the partition you have already). With Leopard and later versions of Mac OS X, this is quite easy as Apple has provided a nifty little tool that will shrink your OSX partition and create a Windows partition in the freed space (which we can convert to Linux partitions later). BootCamp is probably the easiest way to accomplish what you need. After partitioning with BootCamp, it will ask if you want to install Windows now or later, choose Later.
bootcamp-300x230.png
Mac's OS X DiskUtility can also shrink the OS X partition and add partitions in a single step. It cannot create Linux format partitions though, so if you choose this route, you should create “free space” or an “MS-DOS(FAT)” format partition, which can be modified later.
diskutility-300x263.png
At this point, we are really just allocating the space you want for Ubuntu. The actual Linux partitions will be created later during the installation.
For pre-Leopard OS X, there are no such tools. BootCamp does not run, and DiskUtility will only allow you to create more partitions if you wipe out all the current partitions. However, the underlying commandline utility still exists.
Here's a usage example. Let’s say you want to resize your OS X partition to 200GB and leave the rest of the disk free (for Ubuntu of course). You would open a terminal and type the following, followed by the "Return" key.
sudo diskutil resizeVolume disk0s2 200G

You can read more on diskutil by typing 'diskutil help' in your OS X terminal.

The Ubuntu LiveCD


You can download the Ubuntu Desktop Edition ISO from ubuntu.com/download. (You can choose 32-bit or 64-bit, the choice is yours. If you want to see the pros and cons, you can check read this.)
NOTE: Core Duo machines (early Mactels) are 32-bit only! Core 2 Duo machines can use 32-bit or 64-bit ISOs.
An ISO is an “image” of a CD-ROM. You do not burn an ISO onto a CD like you do with pictures or music. Instead, you burn the image onto a disc. It's kind of like mixing Cool-Aid. You don't just drop the packet (ISO) into the water (disc), you must open the packet and dump the contents into the water.
ISO images can be burned with Apple's Disk Utility or other burning apps. You should burn the CD as slow as you can to increase its “bootableness”.

Boot your Mac from the CD


Put the Ubuntu LiveCD in your Mac and reboot.
When the rEFIt menu comes up You should get the option to boot from the Ubuntu CD. If you do not see this option, try pressing the Option key while booting your computer. On a Mac, the "c" key will instruct the Mac to attempt booting off of a CD/DVD.
On the Ubuntu CD’s boot menu, select your keyboard language, then choose to "Try Ubuntu". This will start a LiveCD Ubuntu session, which make no changes to your Mac.
Booting into Ubuntu this way takes many minutes, including a minutes-long period where Ubuntu appears to have locked up on the boot menu. Most likely it has not. Just wait! note I had to set the boot option to nomodeset. If you press function f6 at the boot options screen you can choose that option. Note 2: I had to press function f6 when I saw a man and keyboard.
Once booted, you have a Ubuntu desktop. Start gparted (partitioning tool) by navigating to System > Adminstration > Partition Editor.
If you previously created an “ms-dos” style partition using Boot Camp, you should use gparted to delete this partition. It will be located after an EFI partition (hidden in OSX) and an HFS+ partition (HFS+ is OS X's filesystem). Deleting the new partition leaves “free space” on the disk for the Ubuntu install. Use gparted to manually partition the space on your drive for Ubuntu. First create a SWAP area of about 1GB. Then the rest of the unallocated area format as EXT4. Apply changes and take note the label of the EXT4 partition such as /dev/sda3.

Start Installing


Back on the Ubuntu LiveCD desktop, start the Ubuntu Installer from the desktop icon. When prompted, choose to manually partition. Select the EXT4 partition and click change. Select to use the space as the EXT4 filesystem and root (/) as the mount point. You will also want to check the box to format the partition. On the last dialog of the installer, be sure to click the “Advanced” button and choose to install the boot loader (grub) to your root Ubuntu partition, for example /dev/sda3. This will be the only partition with the EXT4 file system.
When the installer is finished, reboot.
step7.png

Fix the Partition Tables


There is a bug in the installer that causes a problem on Macs. FIXME: Describe problem? It can be fixed with rEFIt.
Reboot to the rEFIt menu and select the “partition tool”. rEFIt will ask if you would like to sync your partition tables. Say Yes and let it do it’s magic. (If you don't have an English keyboard, note that the keys "Z" and "Y" are swapped in the partition tool.) If you see the error "GPT partition of type 'Unknown' found, will not touch this disk" instead of the 'yes' prompt, follow the instructions in comment #6 of this threadand make sure to install gptsync_0.13-10 or higher.
  • rEFIt may not offer to sync your partition tables, but just show the error and leave no option but a return to the main menu. For suggestions on other ways to fix the table, see the discussion at Ubuntu on MacBookPro - difficulties w partition tables.
  • if you have errors such as "GPT partition of type 'Unknown' found, will not touch this disk." or "analysis inconclusive" as explained in this thread, then you have to use gdisk to rebuild the partition table. This is best explained in this post - boot a live Ubuntu CD (the instructions say this is also possible from an OS X terminal), install and run the gdisk tool as the instructions say.
After it is done, SHUTDOWN your Mac (not reboot) and startup again. You should now be able to boot into Ubuntu. If you select the Linux Icon in rEFIt, and it freezes on the grey Tux logo, shutdown again and try one more time.

Epson LX300 Printer settings in Linux

Epson LX300 Printer settings in Linux> you just simply adjust a few things (eg the location menu) as the base distro you use. Most importantly, it is hoped with this brief tutorial readers can take advantage of Epson LX300 printer in Linux distributions are used. Initially the author a little awkward enydorokan also help clients who are classified as ancient printer. But the old is not necessarily inferior to the new is not it? So it's worth a try first. And the process was extremely easy, anyone can try.

Here I will share with you all.

First, of course install the distro IGOS Nusantara 2009 into the client computer, based on client request itself (as of this writing has been changed to version 2010). After the installation is complete, then the printer attached to a computer, of course this is not a USB printer. Then select menu System → Administration → Printing. Once the dialog box appears, select New → Printer. Enter the root password when prompted. Then for the Select Device select LPT # 1 because, as we mentioned earlier, this type of parallel port printers.
Then the author is trying to extent the ability distro IGOS Nusantara 2009 (based on the contents of the database in terms of saving for a variety of printer driver that is) to recognize and run the printer this old well. Select the option Select Printer From Database. Select Epson → Forward. Dot Matrix and select → Select foomatic mid, then Forward and Apply.
Once done, try to test printing through the Test Print / Page. If successful, the resulting print will be printed on paper. If that fails, try again, there may actually be silly errors which may turn on the printer forgot hehe. To facilitate you in print, this printer settinglah order (Epson LX 300 in this case) as the default printer.
Thus a simple article that the author of the blog author's own take on what I did at that time. Can be concluded that the work of the nation is not inferior to foreign products, in this distro GNU / Linux IGOS Nusantara 2009, when compared to other distros. And the old device was not necessarily useless. If we want a little kreaktif, the device was still bsia used, at least, save money for the purchase of hardware. The author did this out of hours taught on campus while helping a co-author of a business and rental comic book store in the city of Denpasar.

Point Of Sale For applications, the authors used Open Source CMS based on PHP Point Of Sale and removed the GNU GPL license. In the other article the author will explain in more detail about one of these applications perkasiran and inventory.

Cara Mudah Membuat OS Ubuntu Portable

Anda pengguna Linux dan sering beraktivitas dengan OS open source ini? Apa yang terjadi bila anda ingin memakai Linux akan tetapi mendapati komputer yang ber-OS lain? Cukup dengan berbekal dengan flashdisk dan PC ber OS apapun anda bisa menjalankan Ubuntu dari flashdisk mungkin dulu kita memakai Live CD untuk bisa menikmati Ubuntu di PC lain tapi sekarang sudah tak jamannya lagi kemana-mana membawa CD.

Cara Mudah Membuat OS Ubuntu Portable Image

Kenapa harus Ubuntu sementara masih banyak distro lain bertebaran diluar sana? Salah satu alasan terkuat adalah Ubuntu merupakan distro yang kompatibel di segala jenis komputer dan tampilannya pun mudah dipahami dan sederhana.

Apabila anda memiliki flashdisk berkapasitas minimal 1GB (semakin besar lebih baik karena anda bisa menginstall bermacam-macam aplikasi) anda bisa menginstall OS Ubuntu langsung dan menjalankannya di PC manapun. Dan tool yang bisa digunakan untuk membuat Flashdisk Anda terisi Ubuntu, anda bisa menggunakan Unetbootin yang bisa diunduh di http://unetbootin.sourceforge.net/

Pilih aplikasi berbasis Windows, Linux atau Mac OS yang sesuai dengan PC yang akan digunakan sebagai basis saat membuat flashdisk ber-OS. DI tutorial kali ini kita memakai Windows sebagai basis PC kita. Lalu pilih Download (for Windows).

Jika anda belum memiliki file ISO Ubuntu silahkan mendownload versi terbaru Ubuntu di www.ubuntu.com. Versi teranyar Ubuntu saat ini Ubuntu 12.04 LTS lalu pilih sesuai chipset anda, i386 atau amd64. Setelah file ISO selesai diunduh, silahkan ikuti langkah-langkah berikut ini:

  1. Siapkan file ISO Ubuntu yang telah diunduh. Letakkan file tersebut di folder tertentu agar lebih mudah menemukannya.
  2. Sebelumnya format flashdisk anda dengan format FAT atau FAT32. Karena FAT mampu dikenal oleh BIOS komputer-komputer lama.
  3. Jalankan aplikasi Unetbootin yang sudah diunduh terlebih dahulu klik 2x bagi WIndows XP dan klik kanan lalu klik run as administrator bagi WIndows Vista dan 7. Lalu akan muncul window seperti dibawah ini.
    Cara Mudah Membuat OS Ubuntu Portable Image
  4. Ada dua pilihan. Distribution jika anda ingin memilih distro lain dan langsung mendownload file ISO dari internet. Pilihan kedua adalah DIskimage. Gunakan pilihan ini jika anda sudah memiliki file ISO di dalam Harddisk, lalu klik browse. Kemudian di pilihan Type pilih USB Drive.
  5. Jika sudah menentukan semua pilihan di window tersebut, klik tombol OK. Maka proses pembuatan akan segera dimulai.
    Cara Mudah Membuat OS Ubuntu Portable Image
  6. Tunggu sampai proses selesai. Sampai muncul tampilan seperti di bawah ini. Untuk mengetest hasil instalasi OS silahkan reboot komputer anda.
  7. Pada saat proses reboot pastikan anda bisa masuk ke BIOS anda, biasanya dengan menekan tombol Delete di keyboard. Lakukan perubahan pada boot setting. Pilih USB Drive sebagai sumber booting pertama, jika sudah anda tinggal simpan settingan BIOS dan lakukan reboot ulang. Dan pastikan USB Drive anda tetap terpasang.
  8. Proses booting akan dilakukan dengan menggunakan flashdisk anda dan jika anda sudah masuk ke menu login Ubuntu selamat anda sudah sukses menginstall Ubuntu di flashdisk, tanpa perlu membuat partisi baru di harddisk anda.
    Cara Mudah Membuat OS Ubuntu Portable Image
    Cukup Praktis bukan, sekarang anda bisa memakai Linux di komputer manapun. Selamat mencoba.

Ingin tahu tips dan trik seputar dunia teknologi? Kunjugi blog ini setiap hari dan akan akana menemukan yang terbaik di sini.

Installing Gnome Shell On Ubuntu Ocelot Oneiric 11:10

Linuxer Good morning, Sunday morning I will share about how to install Gnome Shell on Ubuntu 11:10 Oneiric Ocelot. Unlike previous versions that are still using Gnome 2.3, the latest release of Ubuntu Gnome 3 took 11:10, so we can enjoy a more modern GUI and beauty offered by Gnome 3 without fear of clashing with Unity, but unfortunately Gnome Shell is not installed by default .

To feel we need to install it first, Gnome Shell is available in official repositories on Ubuntu 11:10, we can install it via Console (ed: Terminal) or use the Ubuntu Software Center. To install it there are a variety of ways:

- Install Gnome Shell using the apt.

- Open Terminal * Ctrl + Alt + T, then type the following command:

sudo apt-get install gnome-shell

- Or you can use the search feature available on the Ubuntu Software Center with the keyword "gnome-shell".

- Wait until the installation is complete.


Once completed, the

Restart your computer after you enter the page login screen choose Settings> Gnome.

* = Gnome Gnome Shell Interface
* Gnome Gnome Classic = Interface which has upper and lower panels such as the Ubuntu 10.10
* Gnome Classic (No effects) = Same as pick Gnome Classic but less effect.
* Default Interface Ubuntu = Ubuntu, which is Unity 3D.
* Ubuntu 2D = Ordinary known as Unity 2D with less effect.

All Done. What do you think, more beautiful Gnome Shell or Unity? :)

Easy is not it? A few weeks tutorial this morning. Now it is your turn to try. Have Fun. :)

Gnome Shell Settings As Default Interface At 11:10 Oneiric Ubuntu Ocelot

Good Night Linuxer, since Ubuntu launched Unity as default interface, not all Ubuntu users are comfortable with the display or perform it, there may be some Ubuntu users are more likely to be comfortable using the interface in addition to Unity. In this tutorial we will change the default Unity interface / desktop from Ubuntu with Gnome Shell 11:10. For those who have not installed Gnome Shell on Ubuntu, please first read the previous article Installing GNOME Shell in Ubuntu 11:10 Oneiric Ocelot.

It's easy,

- Open a terminal and type the command "

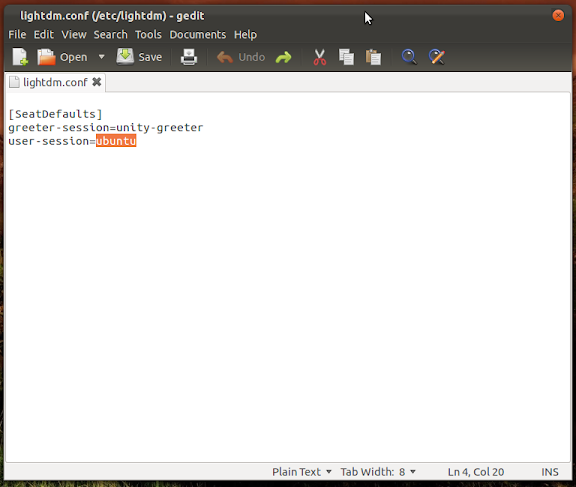
sudo gedit / etc / lightdm / lightdm.conf

Command will call the existing file in the folder lightdm.conf lightdm> etc with gedit as the editor application.

Replace command 'ubuntu' with 'gnome-shell' command in user-session. thus becomes:

“user-session=gnome-shell”

* Ctrl + S Save the file, when you reboot your computer, Ubuntu will automatically go to the Gnome Shell, do not worry, you can still get into Unity by first selecting it in the settings when you go to the Login Screen.

All done, now try by yourself. :)

Manual install Nvidia Drivers in Ubuntu 11:10

Make use of your Nvidia graphics card, after installing ubuntu 11:10 would have been able to feel the effect of unity is 'awesome' really. But keep in mind is not using the Nvidia display driver but Nouveau driver that automatically include in each release of ubuntu.

Nouveau driver is in my opinion is still lacking to support the OpenGL 3D akeselerasi. In addition kompie so often hangs after a few minutes in use.

Okay, here's how to manually install the Nvida drivers on Ubuntu 11:10

First download the updated release of the Nvidia Drivers here. Choose the appropriate Nvidia products with your property. I use the NVIDIA driver version 285.05.09.

When finished downloading, now we're going to do a manual installation. How to access CLI mode by pressing Ctrl + Alt + F1 on the keyboard.

Turn off the desktop manager to write the syntax

sudo stop lightdm

After that we must meremove nouveau driver in the kernel by typing the syntax

sudo apt-get - purge remove xserver-xorg-video-nouveau

If it is now navigate to the folder where we store the NVIDIA driver we just downloaded. Use the command 'cd'. For example: cd / home / Aditia / Download /.

To make sure we were in the correct folder, use the command 'ls' to find the file that we download. If they are correct, then the next step is to install the Nvidia driver. You do this by typing the syntax

sudo sh ./NVIDIA-Linux-x86_64-285.05.09.run

Follow the wizard from the Nvidia driver, I suggest you to check more carefully to "iya'kan wizard.

If the installation process has been completed, we can immediately return to the desktop using the command

sudo start lightdm

Okay, so how to manually install the nvidia driver on ubuntu 11:10 Oneiric Ocelot. For anybody know any other way, can share in the comments. Thank you.

install jade on linux ubuntu 10-10

ade (Java Agent Development Framework) is an implementation of the DSSSL style language. Jade engine is a useful tool (in conjunction with a DSSSL style sheet) for translating SGML documents into other formats. Jade can currently generate SGML, RTF, and TeX. In conjunction with the style of "jadetex" TeX, can produce output that is pretty good. Authors: James Clark (dpkg package descriptions)

It's easy, follow these steps:

1. Open your ubuntu terminal

Accecories - Terminal

2. Sign in super user

Type in terminal: $ sudo su

Then write your Ubuntu password

3. Install Jade online

Before installing it online, make sure the repository has been set, the server can use indoensia or abroad. For Indonesia the server could use: http://kambing.ui.ac.id/ubuntu

Type in terminal: $ apt-get install jade

20 Linux Server Hardening Security Tips

This summary is not available. Please click here to view the post.

How to install Linux - tips and concepts

Every day there are more that are passed to Linux but still are many who have an incredible fear to install. There is still this belief in some parts of linux gurus is only for computer science. Some are afraid to install Linux on their PCs because they have important things and is always fear of losing everything. So I'll try to explain a little like process of installation of almost all distros in general and some tips and concepts you need to know to reduce to almost zero risk of damaging something during installation.

Distributions

First need to know that there is no "one linux, linux distributions there. The distributions are different versions with different features, some are easier to handle than others, some have special features such as being designed to work on servers or serve a special group of people such as distributions designed specifically for programmers.

The one you are interested in all distros designed for home and average user, I recommend including: Ubuntu, Fedora, Linux Mint and Mandriva to be easiest to use and on which more info is available online.

Linux and Windows

It is a basic question that I have done many times. You can install linux with windows? The answer is YES. A term to remember is GRUB, which is what is responsible for managing whole issue of starting pc. Those who install Linux alongside Windows will then boot to a menu which will allow to boot. Many installed linux with windows because they are afraid they do not like linux or something. I would tell them that directly encourage and install linux and windows erased. They will not regret it.

Partitions

The hard disk partitions is issue that most have difficulty learning to all learners and what gives them more afraid. It really is something easy to learn and understand. In windows probably have one, two or more partitions. Example: you can have a partition called C where windows and other D where they have music, movies and important documents. Good on Linux partitions do not call letters, but rather would be something like: partition /dev/sda1 is equivalent of C and partition /dev/sda2 is equivalent to D.


What partitions needed for Linux? Basically you need only 2 but it is advisable to 3. The two are necessary to move system partition linux itself, this partition is called root and is symbolized by slash (/) and another partition called SWAP, the latter is a partition that acts as virtual memory and does nothing more that.

Apart from these two is always recommended to make a partition for your home folder, this partition is called HOME and symbolizes so / home. See that has a bar below is because HOME is part of root (/). It is good to create this partition it so when they change distro or version of Linux will always have your saved settings, desktop preferences and preferences of its applications such as firefox bookmarks or email accounts in thunderbird.

All partitions can be created from same linux while installing but I always recommend to make them from an environment they know best, that is from windows and using some program called Partition Magic. If you can not do partitions ask your brother, uncle, friend or anyone who has a minimum knowledge of computing and hara.

The partition sizes

A larger question is size of partitions. It's simple, make root with a minimum of 4GB and at least 2GB for HOME, and swap partition of 1GB or 1.5GB.

If you have possibility of allocating more size to partitions is also good to know limits, is really no limit as to maximum size but some recommendations:

* The roots make a maximum of 10 gigabytes, almost no one reaches that limit.
* The maximum SWAP 2GB, nobody uses more than 2GB.
* HOME And if they can make it as big as you want.

The root user and all rest

Know types of users is basic to linux then do various tasks in system. There are two types of users in linux:

The root: It is super user, administrator. The root user can change settings to taste, remove what you want and manage hardware as you want. It's root is only one who can install programs and this is something to consider.

The rest: Ordinary users will not have permissions for root user. You may not install programs or delete important files. By default this will be user to use and is one of main reasons why Linux is so safe, because with common user can not break things

The installation process

Each distribution has an installation process that basically consists of select language, select time zone, set partitions, choose root password (do not forget this password!) And place data from a normal user, it would be best that this user does not have same password that user root.

Programs

Installing programs on Linux is just as painless to install on windows. The only difference is that not only come with. Exe in linux extensions are best known. Deb and. Rpm. The hoes so, in some distros are used. Deb and in others. Rpm, eg on Ubuntu and Linux Mint are used. Deb and Fedora's. Rpm

Where to buy? That's best part, you have to look anywhere, is more or need to acordate anything about extensions or anything because in linux you have all programs you want on free sources and public access.

Repositories

The Linux repositories are places on web where they are stored all or great majority of programs for linux. Each distribution has its own list of repositories and what it gives us is installation of programs by just typing a single command. For example: you want to install firefox? So open a console and type "sudo apt-get install firefox" and only come down and be installed. Want to thunderbird? "Sudo apt-get install thunderbird" and ready.

That string may vary dependendiendo of distribution you use. For example if you use Arch Linux instead of "sudo apt-get install" serious "sudo pacman-S" but still is a very easy to install programs because they will have to find a place to download them no problem on how to install it yourself.

The console

While almost everything in linux can be done today with graphics programs blogs, forums and sites are explaining things linux using console. Why? Because it is faster and easier. Fear of a console is stupid, it's just a small program where you write something and press enter. In Ubuntu you can find it in Applications-> Accessories-> Terminal and is better than fence they were afraid because all statutes are explained almost always using console commands.

Not much more to know, with 10 minutes of reading, now you know more than linux but noted that this post is written for beginners.

ATTENTION AND REQUEST : work we need snacks. I hereby asked to give a small donation with click. thank you for willing to visit

Some Tips To Speed Up Firefox

ATTENTION AND REQUEST : work we need snacks. I hereby asked to give a small donation with click. thank you for willing to visit

Mozilla Firefox is an excellent web browser that does a much better job than Internet Explorer when it comes to protecting your privacy and computer security. Unfortunately, Firefox can sometimes be slower than Internet Explorer. The speed difference between the two browsers is one of the main reasons why most people do not change their browser from the quicker yet more vulnerable Internet Explorer to the slower but more secure Firefox browser, the other reason being that Firefox introduces many new features that simply take more time to learn than some users are willing to invest. To get the best of both worlds – speed and security of browsing – you can download Mozilla Firefox and speed it up with these tips.

Pipelining

This tweak is very easy to accomplish. On your Firefox web browser address bar, type about:config, then press Enter. Scroll through the list of values and look for these three crucial pipelining settings: network.http.pipelining, network.http.proxy.pipelining, and network.http.pipelining.maxrequests. You can use the filter to easily find each of these entries.

For the pipelining entry, you should change the value to true. Just double click the false value to make this change. For the maxrequests entry, the default setting is four. Change the value to your desired number. This value determines how many page requests Firefox is capable of making. You can go as high as 8 to speed up your tabbed browsing. Finally, go to proxy.pipelining and change the value from false to true.

Doing the above steps will give you greater browsing speeds by allowing Firefox to process and send requests simultaneously instead of waiting until a response has been received from a previous request. This will also reduce network bottlenecks by packing multiple requests into a single data packet.

Increase Your Firefox Memory Cache

Your computer will automatically allot a memory cache for your Firefox browser. Increasing your browser cache will actually increase the amount of objects that your browser can retain, which cuts down on time spent retrieving information from your hard disk or a web server. As a result, your frequently visited pages will load much faster.

You can modify the cache settings by going to the Firefox tools menu and clicking on Options. From here, click on the “Advanced” tab, then the “Network” tab. On the network tab, you can specify any cache size you like, but it is doubtful you will need more than about 32 Megabytes of cache.

Block Unwanted Advertisements

One of the best ways to speed up Firefox is by using an Ad Removal extension, such as AdBlock Plus. AdBlock Plus can be installed at https://addons.mozilla.org/en-US/firefox/addon/1865, and it works to block annoying banner ads. AdBlock Plus also features a “learning” feature, meaning you can right-click on unblocked ads and set them to be blocked, as well. Even with no other optimizations, Firefox will load most pages much faster than Internet Explorer when using AdBlock Plus, because it does not have to worry about downloading all of the annoying, unwanted ads that clutter up so many webpages.

Another plugin, called FasterFox, implements a large number of tweaks based on increasing the speed of your browsing. FasterFox is available from: https://addons.mozilla.org/en-US/firefox/addon/1269.

With these tips, you can speed up Firefox considerably, so don’t let the slow performance you may have experienced deter you any longer. Firefox works to provide a much safer browsing experience than Internet Explorer, and its plugin interface allows for unprecedented levels of customization and convenience.

MALIBAL is the Home of the World’s Fastest Laptops! Please, check out these recommendations for the best laptop & notebook computers.

Recent Post